Ensuring decisive and accurate dimension of the pipes during extrusion is an added requirement that most pipe manufacturers find necessary in today’s highly competitive industry. Many pipe measurement systems have been introduced and accepted in the market for their ability to meet the target.
A new pipe measurement technology was recently launched at K 2019 by SIKORA, manufacturer and worldwide supplier of innovative measuring and testing technology.
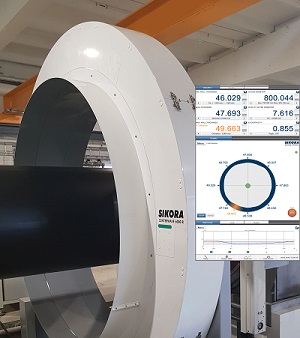
With the world premiere of the CENTERWAVE 6000/1600, SIKORA presents a measuring system of a new dimension. The system was developed especially for quality control of plastic tubes and pipes during extrusion. Due to its design, the system offers a precise measurement of tubes with a diameter from 250 to 1,600 mm. The CENTERWAVE 6000 is based on innovative millimetre wave technology and measures continuously and completely over 360 degrees of the circumference of the pipe the wall thickness, the diameter, the ovality, the inner profile and the sagging. “The CENTERWAVE 6000 does not only impress because of its dimensions,” says Christian Schalich, Head of Sales Business Unit Hose & Tube at SIKORA, “but foremost due to its benefits resulting from the technology for the extrusion process.”

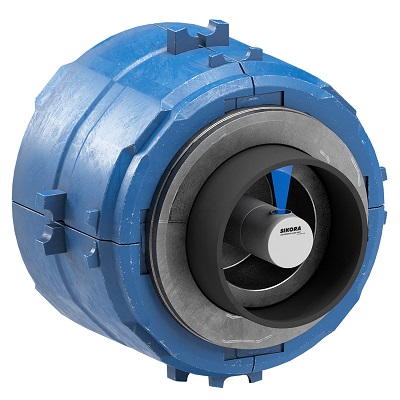
The CENTERWAVE 6000 NEXT “to the pipe head“ measures the wall thickness, concentricity and the diameter of pipes after the pipe head.
Nominal dimensions are quickly reached, start-up scrap is avoided, the highest quality guaranteed and processes are optimally controlled. Furthermore, the system does not require any coupling media, it measures precisely and independently to external influences, such as temperature or plastics material, and does not require calibration. “Furthermore, the device determines automatically the exact refractive index”, says Mr. Schalich. It defines the intensity and how fast radiation travels through the material and is therefore decisive for the measuring accuracy. Manual input of modifications of the production conditions is not required. “The operator benefits from a system that, integrated in the line, delivers reliable and reproducible measurement values directly after start-up”, adds Mr. Schalich.
Next to the pipe head
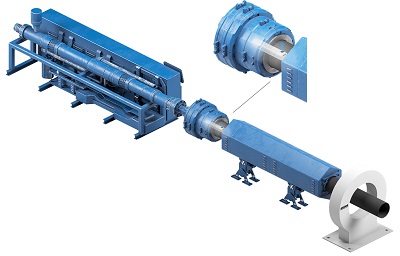
The CENTERWAVE 6000 NEXT “to the pipe head” measurement technology is based on millimetre wave technology and it measures the wall thickness distribution directly after the pipe head gapless over 360 degrees of the circumference already at the starting of the production line. In combination with the proven CENTERWAVE 6000 after the first vacuum tank, the warm measuring values as well as the already stable and final cold values of the wall thickness of the pipe are measured by the CENTERWAVE 6000 NEXT “to the pipe head”. A rotating radar sensor is connected with the pipe head and is positioned directly in the centre of the pipe. By means of millimetre wave technology, wall thickness, diameter and concentricity are measured over the circumference from the inner side of the pipe. These are controlled without delay to the minimum permitted nominal value at optimum concentricity. The interaction of both systems allows for the compensation of typical plastic pipe dripping effects (sagging). The measuring values are graphically visualised.
Already prior to the first vacuum tank and thus, immediately after the pipe head, the system measures the decisive dimensions of the pipe from the inside at the start of the production line. For the first time, measuring values for wall thickness, concentricity, inner and outer diameter as well as information on weight per metre are available at such an early stage of the process. Thus, plastic pipe manufacturers receive the basis for a control and centering without delay, at the beginning of the extrusion process.

CENTERWAVE 6000 is based on innovative millimetre wave technology.
The operation of the systems is intuitive and easy without any prior knowledge about the material and its high frequency characteristics. Precise measuring values are generated, only the entering of the nominal value is required if this has to be controlled. When controlling the wall thickness to the minimum value, the software automatically determines the necessary addition to the nominal value.
By using the CENTERWAVE 6000 NEXT “to the pipe head“, the start-up process for the extrusion of a pipe is significantly facilitated and simultaneously shortened. Thus, the production process is optimised, the highest quality of the pipe ensured and costs are saved. A fast Return on Investment (RoI) is guaranteed.
Measurement and testing systems
SIKORA also featured its PLANOWAVE 6000 which is a non-contact measuring system that is used for non-destructive thickness and density measurement during the extrusion of plastic sheets. The system measures sheets made from engineering plastics like POM and high-performance plastics like PEEK. The PLANOWAVE 6000 is also suitable for the measurement of transparent and synthetic plastics like PMMA and PVC-FOAM as well as for glass. The measuring method is based on millimetre wave technology for the highest measuring accuracy independent of material and temperature of the sheets. A calibration on the material is also not needed.
The PLANOWAVE 6000 can be integrated directly into the production line at the hot or cold position. The visualisation of the measuring values is done in real time at the monitor of the processor system ECOCONTROL 6000. Besides a numerical display of the measuring values at any number of measuring points over the width of the sheet, the operator also receives a graphical display with extensive trend and statistical functions.
Turning ideas into innovations and product developments that achieve the highest quality, process optimisation and cost effectiveness in the hose and tube, sheets as well as plastics industries is SIKORA’s claim. The company put emphasis on these aspects at K 2019 through its “Innovation Corner”. Customers were invited to personally discuss with SIKORA experts from Research and Development in a creative atmosphere their ideas, requests and technical requirements on the systems for quality control for the future of measuring technology.

CENTERWAVE 6000 NEXT “to the pipe head“ and CENTERWAVE 6000 integrated in the extrusion line
SIKORA AG was founded in 1973 and is today a leading global manufacturer and supplier of measuring and control technology for the wire and cable, hose and tube, sheets as well as optical fiber, metals and plastics industries. With around 300 employees worldwide, 14 international offices and more than 30 regional representatives, the company provides customers with innovative product solutions and individual service. The measuring and control systems are exclusively made at the headquarters in Bremen/Germany. Innovation, product quality and customer satisfaction define the daily activities at SIKORA AG.
Nemeziz 17+ 360 Agility FG TPU


