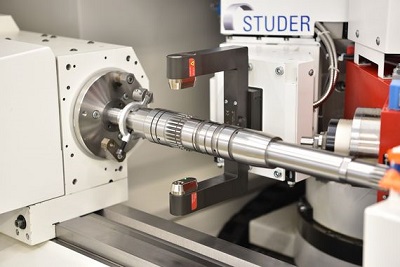
Demands for integrated production measuring technology
Finishing processes on grinding machines often demand exacting tolerances in relation to dimension, form and position accuracies, as well as highly accurate surface qualities. Often companies have empirical values available to fulfil these requirements. However, with small lot sizes in particular process evaluation on the machine is desirable, as intermediate measurement on external measuring machines and the resulting corrections prolong the processing time for part machining. These control measures would significantly increase process reliability and productivity. Solutions that can be flexibly used for a wide variety of workpieces are ideal and preferable.
Possibilities of process measuring technology in grinding processes
Production engineers have diverse measuring functions available for process evaluation, which are based on different principles of production measuring technology. The measurement of process forces such as grinding forces (Ft, Fn) or comparative grinding spindle currents, for example, provide an index for achieving the service life of tools or, equally important, they enable the determination of fluctuating allowances, which can influence process stability and compliance with required tolerances. In addition, tool costs can be reduced, as excessive dressing is prevented. Familiar acoustic touch sensors assist so-called contact detection in the grinding process to reduce grinding time, or monitor the true-to-profile dressing process with its envelope curve functions. Tactile measuring systems such as measurement and control systems for diameters or workpiece lengths, pneumatic systems or microsensors for longitudinal expansions of spindle systems also support increased process reliability. Other measuring functions can also be described here, such as the use of camera or laser systems for process monitoring. Laser measuring technology in particular opens up interesting fields of application.
Integration of laser measuring technology into STUDER universal cylindrical grinding machines
STUDER can draw on more than 10 years of experience in the use of machine-integrated laser measuring technology, which have been evaluated for trials in the measurement of grinding wheels or workpieces. Such fundamental studies have a tradition at STUDER, to ensure the company is prepared for future trends in production technology. This knowledge and experience has been used to respond to the current requirements. The systems used in other industries for tool monitoring have been further developed STUDER-specifically on the basis of the latest laser measuring technology, only recently available, for measuring workpieces on grinding machines.
The necessary measuring device (see U-profile in figure 4) is mounted mechanically, similarly to our measuring probes on our B-axes, which carry the relevant grinding spindle. In fact, this situation is not an unfamiliar one for the operators.
The size of this measuring device can be adapted to the workpiece diameter. The existing air nozzles for blowing off the workpiece during measurement and the newly developed dirt screens efficiently protect the laser optics from the cooling lubricant in the machine. In comparison to previous models, the laser unit manufacturer also uses an enhanced, more accurate laser optics. However, the most striking element from our point of view is the possibility of generating many thousands of measuring points for evaluation with the workpiece rotating. This significantly reduces measuring time. These features have been integrated into the STUDER-specific measuring cycles. The user is thus provided with a suitable method for non-contact measurement for the machining of precision workpieces.
It should also be mentioned that not only can different diameters be recorded with a laser measuring device, but precise control measurements can also be carried out on "interrupted" diameters, such as shafts with keyways or longitudinal grooves and toothed gears in the diameter range (see Figure 2). The setup and resetting of previously used tactile in-process gauging devices is omitted, and efficiency rises dramatic.
The measuring cycle can be selected as desired after each machining operation or at the end of the grinding process. The STUDER software logs (see Figure 3) the measured values per diameter after each measuring cycle. This process enables the operator to ascertain the quality of the ground component at a glance.
Example of application of laser measuring technology for cutting tools
A very efficient example of the use of an integrated measuring strategy is the complex machining of small batches of tools with PCD cutting edges. Often the question here is who is machining who, the diamond grinding wheel the tool, or vice-versa. The so-called "closed loop process" with tactile measuring devices is often used for this purpose (Figure 3). The cutting edges are measured, ground, measured, etc. in several iteration stages. Diameter tolerances of +/- 1.5 micrometer are achieved with this measure, which is a very good result. An increasing demand for non-contact measurement has developed for these applications, as the PCD cutting edges sometimes react sensitively to tactile measurement.
This demand for non-contact measurement of tools in this tolerance range, which have cutting edges or guide rails, can now be met with the integrated laser measuring technology described here (Figure 4). Typical measuring tasks which are required in this sector are, for example:
Measurement of a tool with cutting edges, where the smallest and largest cutting edge diameter are determined in a measuring plane.
Measurement in two different planes of the cutting tool, i.e. in different planes of the measuring cylinder generated by rotation, gives the dimension of the desired taper on cutting tools, which can now be output.
Depending on the measuring differences between the diameter of cutting edges and guide rails of a cutting tool in the same measuring plane, the laser optics can determine this diameter even with the workpiece rotating. This will be the case for most tools and will have a positive effect on measuring time reduction.
STUDER measuring cycles can help anyone who wants to know before machining and with the tool to be ground clamped, how large the runout is from the tool shaft to the cutting edge diameter at the end of the tool.
Conclusion
The presented strategy for machine-integrated laser measuring technology expands the possible applications of process measuring technology in grinding machines. A precise, universal, non-contact measuring process supports the user in his efforts to increase efficiency in precision machining.


